
Photographing Florida Wildlife from Land
Oct 06, 2026
Some of Florida’s best wildlife photographs can be made with both feet on dry ground. You do not need a boat, kayak, expensive guided water access, or backcountry equipment to find an egret working a marsh edge or an owl resting beneath Spanish moss. Wildlife refuges, wetland boardwalks, preserves, state and county parks, beaches, observation areas, and permitted wildlife drives can put you in the right place.
Photographing Florida wildlife from land begins with a simple shift in attention: learn where an animal is likely to feed, rest, or travel, then give it room to behave naturally. The following field approach works around Tampa Bay and across the state. It is about making better decisions from accessible places, not promising a sighting on every visit.
Why Florida Is Ideal for Land-Based Wildlife Photography
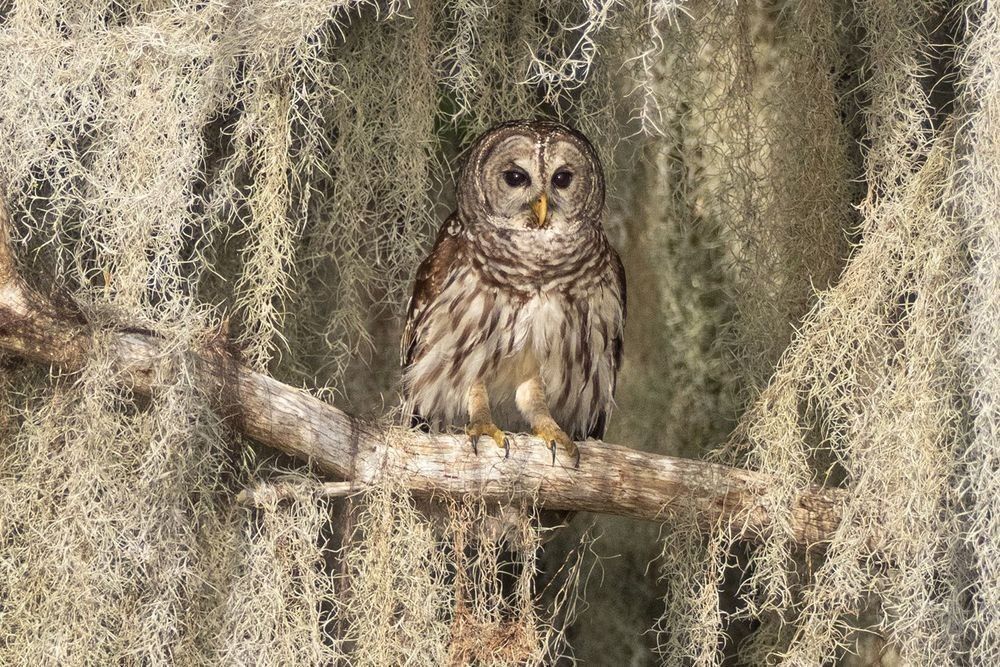
Florida compresses a remarkable range of habitats into manageable distances. A morning might begin beside freshwater marsh and end on a Gulf beach. Wetlands can hold herons, egrets, wood storks, roseate spoonbills, alligators, and turtles. Coastal edges bring shorebirds and ospreys. Pine flatwoods and forest edges offer other possibilities, from hawks and owls to deer and the occasional bobcat. Bald eagles may be visible in appropriate areas, but no location can guarantee any species.
That variety is one reason we keep returning to familiar places. The same trail can look entirely different with a change in water level, tide, season, or light. If you want to see how subject and setting work together in our finished images, browse the Artistic Creationz wildlife photography collection and our shore bird photographs.
Start With Habitat, Not Just a Species
Searching only for one bird can make you walk past the photograph right in front of you. Instead, read the place. Look along marsh margins where shallow water meets vegetation. Check exposed banks, ponds, mangrove edges accessible from shore, open fields, pine flatwoods, and the line where forest meets clearing. On beaches, watch the tide and where birds are feeding or resting. Rookeries can be productive from legal public viewpoints; they are never an invitation to cross a closure or move closer to nests.
Early morning and late afternoon often give you softer light and active wildlife, but a clock is only a starting point. A dropping tide may create feeding opportunities in the middle of the day. Seasonal breeding, water levels, weather, and human activity can matter more than arriving at an exact hour. Make notes after each visit: where did the light fall, what was the water doing, and how did animals use the habitat? That record is more useful than a generic list of “best spots.” Our Tampa Bay wildlife photography journal article explores the same relationship between patience, light, and the moment.
Use Your Vehicle as a Photography Blind
On a designated wildlife drive or a road where stopping is permitted and safe, a vehicle can be an excellent blind. Many animals react less to a car moving slowly along an established route than to a person walking straight toward them. Have the camera ready before entering the drive. When you find a subject, stop only in an allowed place, keep clear of traffic, and photograph through an open window. Turning off the engine can reduce vibration when it is safe to do so.
Move gradually and watch the animal’s response. If it stops feeding, changes direction, or fixes its attention on you, you may already be too close. Do not leave designated roads, park on fragile ground, or block a lane for a photograph. Getting out and walking toward the same animal usually defeats the advantage the vehicle gave you. A missed frame is better than an unsafe stop or a stressed subject. Florida’s wildlife viewing guidance also describes how a car can function as a blind.
Boardwalks and Trails Can Produce Exceptional Images
A boardwalk may fix your position, but it does not fix the photograph. Before raising the camera, look beyond the subject. Is a bright railing crossing the background? Could a few steps along the public path place dark vegetation behind a white egret? Can you wait for the bird to move into a patch of good light? Small changes in where you stand often improve an image more than changing equipment.
Observation decks, nature trails, wetland paths, and shorelines reward anticipation. Watch where a heron repeatedly strikes, where an osprey returns to a perch, or how shorebirds move with the waterline. A lower camera angle can make an image feel more intimate, but only where you can reach that position safely and legally. Include reeds, reflected water, or a sweep of beach when those details explain the animal’s world. The strongest frame is not always the tightest one.
Let Wildlife Come to You
Repeatedly closing the gap usually makes the photograph worse. An alert bird looks stiff, an animal may stop feeding, and a flight caused by your approach is not natural behavior. Choose a position with a useful background, settle in, and allow the animal to resume what it was doing. Watch its posture and line of travel. Sometimes it will move nearer; sometimes it will not. Both outcomes belong to wildlife photography.
Use focal length and a thoughtful crop instead of demanding physical proximity. Never bait wildlife for a photograph. Respect posted distances, nesting areas, seasonal closures, and every refuge or park rule. If other visitors arrive, leave them room to enjoy the place too. Patience creates the possibility of behavior photographs that a rushed approach would erase.
Choosing Lenses for Florida Wildlife from Land
A 100–400mm zoom is flexible for boardwalks and nearby subjects. A 150–600mm or 200–600mm zoom can give you working distance along open marshes and shorelines. Photographers who prefer primes may use 300mm, 400mm, or 500mm lenses for their handling or optical strengths. A teleconverter can help when light and autofocus performance allow, though it usually costs some light and may slow the setup.
Long glass is valuable because it lets you keep a respectful distance, not because every photograph must fill the frame with feathers. Carry a shorter lens if a bird in its wetland, an alligator beneath dramatic clouds, or wildlife within a coastal landscape might tell the stronger story. The right lens is the one that fits the distance, behavior, and picture you are trying to make.
Camera Settings for Wildlife
Start with a shutter speed that fits the motion. A still owl on a stable perch may need far less speed than a bird lifting off. For moving wildlife, many photographers begin around 1/1000 second and adjust; birds in flight may call for 1/1600, 1/2000, or faster, depending on wingbeat and direction. These are starting points, not rules. Review sharpness at full size when conditions change.
Use an aperture that gives the depth of field your subject needs while keeping enough light for the shutter speed. Auto ISO can help when a bird moves between sun and shade. Continuous autofocus and short bursts improve your chances during unpredictable movement, but a long burst does not replace following the animal’s eye and anticipating action. White egrets and spoonbills can lose highlight detail quickly in Florida sun; check the histogram or highlight warning and use exposure compensation when necessary. Recheck exposure when the bird moves from dark foliage to bright water or open sky.
Florida Light Can Be Beautiful—and Difficult
Warm early or late light can bring texture to feathers and depth to a scene. Overcast skies can soften contrast, especially on pale birds. Backlight can outline a wing or make wetland grasses glow. Storm clouds may add atmosphere, provided you can photograph from a safe place and leave when conditions demand it.
Midday light is harder: white plumage becomes bright, shadows deepen, and water throws reflections back toward the camera. Look for a subject in open shade, change your angle relative to the sun, or make a graphic image that uses the strong contrast. Watch the background as carefully as the exposure. For more on how light changes a photograph, see our journal piece on golden hour and the landscape. The same habit of reading light applies to wildlife.
Photograph Behavior, Not Just Portraits
A clean portrait has its place, especially when expression and detail carry the frame. But feeding, hunting, preening, courtship, flight, parenting, and interaction often tell a fuller story. Watch for a shift in posture before an osprey launches, a heron’s pause before it strikes, or two birds reacting to one another. Leave space in the frame in the direction of movement and keep an eye on what is happening just outside the viewfinder.
Behavior also changes how we edit. A technically perfect frame with no feeling may be less compelling than a slightly quieter image that shows a genuine moment. Our birds of prey gallery shows several ways a wildlife subject can hold attention through posture, expression, and light.
Stay Ready Between Locations
Do not pack the camera away the moment you leave a boardwalk. Keep it accessible, with a sensible baseline exposure and autofocus setup, while traveling through areas where stopping and photography are allowed. Charge batteries before you leave and carry enough memory cards. Scan fence posts, tree limbs, ponds, utility poles, shorelines, and open fields without taking your attention from driving. Pull over only where permitted and safe before using the camera.
Some memorable encounters happen between the places you planned to photograph. Readiness gives you a chance to respond without rushing the animal or yourself.
Respect the Wildlife and the Location
Good fieldcraft starts with distance. If an animal changes its behavior because of you, back away. Never block its escape route, pursue it, disturb a nest, or use food to draw it closer. Stay on permitted roads and trails, honor beach and refuge closures, and leave vegetation and habitat as you found them. Do not share precise locations of sensitive nests when that attention could put wildlife at risk.
These choices improve the photographs as well as protect the subject. An animal that can feed, rest, or care for its young without interruption offers a more honest image. The Florida Fish and Wildlife Conservation Commission’s viewing ethics are useful reading before visiting a new area. Check the individual park or refuge’s current rules too; access and closures can change.
You Don’t Need a Boat to Photograph Florida Wildlife
The most useful wildlife skill is often observation. Revisit a place, notice seasonal patterns, learn where the light falls, and wait long enough for natural behavior. From a trail, boardwalk, beach, observation deck, or permitted wildlife drive, those habits can lead to photographs with both a strong subject and a real sense of place.
That is the approach behind much of our fine-art wildlife photography. If you would like to explore field instruction, Artistic Creationz is developing land-based Florida wildlife photography tours and wildlife photography workshops. The most important first step is simpler: go to an accessible place, give wildlife space, and pay attention to what unfolds.
— Neal Nachman | Artistic Creationz Photography